There is nothing quite like the taste of a sun-warmed, homegrown tomato. For many gardeners across the United States, growing tomatoes is a beloved summer tradition. Not only do homegrown tomatoes offer unmatched flavor, but they also save you money at the grocery store and bring a deep sense of satisfaction to your backyard, patio, or balcony. While buying small plants from a nursery is easy, learning how to grow tomatoes from seed is much cheaper and opens up a world of unique varieties you cannot find in stores.
This step-by-step beginner guide will walk you through the entire process. From choosing the right seeds to harvesting juicy, ripe fruit, you will find everything you need to start your very own tomato garden this season. If you’re new to gardening, start with one or two tomato plants to learn the basics before expanding your garden. Let’s dig in and get your hands dirty!
Understanding the Basics of Tomato Seed Starting
Why do so many US gardeners bother with tomato seed starting instead of just buying starter plants? The main reason is the climate. Tomatoes are warm-weather crops that hate the cold. In many parts of the country, the outdoor growing season is simply too short to start seeds directly in the ground. By starting tomato seeds indoors, you get a head start on the season, ensuring a longer and more abundant harvest window.
The basic timeline is straightforward: you should aim to start your seeds indoors about 6 to 8 weeks before the last frost date in your area. Knowing when to plant tomatoes outdoors is crucial, and this date varies wildly depending on your specific US planting zones. A quick online search using your zip code will tell you exactly when it is safe to move your baby plants outside.
Choosing the Right Tomato Varieties
Before you buy supplies, you need to pick your seeds. Seed catalogs offer thousands of options, which can be overwhelming. Let’s break down the choices.
Determinate vs Indeterminate Tomatoes
The first major choice is between determinate vs indeterminate tomatoes. Determinate varieties grow to a fixed height, produce all their fruit at once, and then stop growing. They are bushy, compact, and perfect for container tomato gardening or small spaces. Indeterminate tomatoes, on the other hand, are vining plants that keep growing and producing fruit until the first fall frost. They need more space and sturdy support, making them ideal for larger raised bed tomatoes or traditional garden rows.
Best Tomato Varieties for Beginners
If you are new to gardening, look for tomato varieties for beginners that are disease-resistant and reliable. Cherry tomatoes like ‘Sun Gold’ or ‘Sweet 100’ are incredibly prolific and easy to grow. For making sauces and pastes, Roma or plum types like ‘San Marzano’ are excellent choices. If you want a classic slicing tomato for sandwiches, ‘Celebrity’ or ‘Early Girl’ are fantastic, forgiving options.
Picking Tomatoes for Your Climate and Space
Always check the “days to maturity” on the seed packet. If you live in a northern climate with a short summer, choose early-maturing varieties. If you have limited space, focus on dwarf or patio varieties specifically bred for pots. Matching the plant to your environment is one of the best tomato growing tips you can learn early on.
Supplies You Need to Start Tomato Seeds
Gathering your supplies is a fun first step. You do not need a massive budget to get started. Here is what you will need:
- Quality Tomato Seeds: Decide between heirloom seeds (which you can save for next year) or hybrid seeds (often bred for disease resistance and higher yields).
- Seed-Starting Trays: Plastic cell trays with clear humidity domes or small biodegradable pots work perfectly.
- Seed Starting Mix: Do not use garden soil! A sterile, lightweight seed starting mix is the best soil for tomatoes at this stage because it prevents disease and allows delicate roots to spread easily.
- Labels and Markers: Popsicle sticks or plastic tags to remember what you planted.
- Watering Tools: A gentle spray bottle or a watering can with a fine rose attachment.
- Light Source: A bright, south-facing sunny window, or better yet, LED grow lights.
- Heat Mat (Optional): A seedling heat mat can speed up tomato seed germination by keeping the soil cozy and warm.
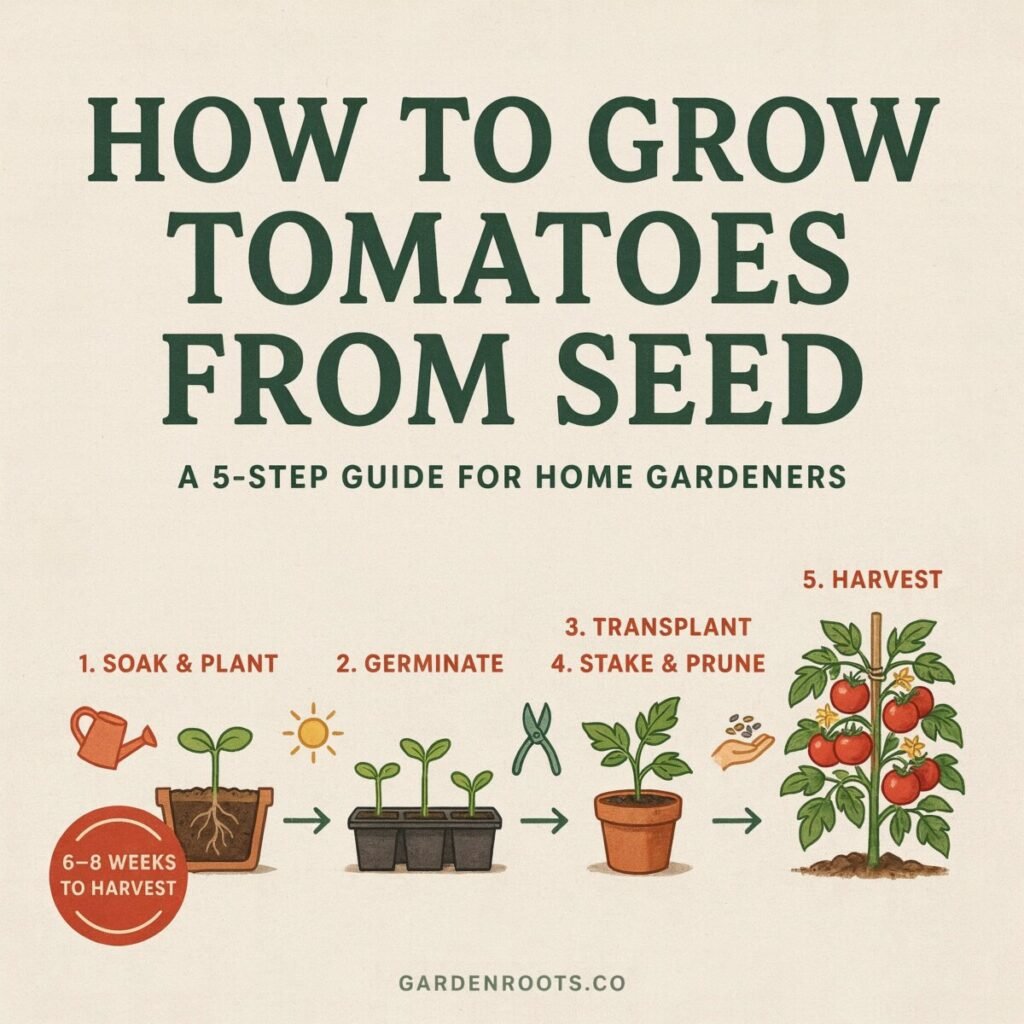
Step-by-Step: How to Grow Tomatoes from Seed Indoors
Now for the fun part! Follow these simple steps to get your seeds sprouting.
Step 1: Check Your Last Frost Date
Count backward 6 to 8 weeks from your local last frost date. This is your target seed-starting date. Starting too early results in giant, root-bound plants, while starting too late delays your harvest.
Step 2: Prepare Your Seed-Starting Mix and Trays
Moisten your seed starting mix in a large bowl before filling your trays. It should feel like a wrung-out sponge—damp, but not dripping wet. Fill your cells or pots to the top and gently firm the soil down, leaving a tiny bit of space at the top.
Step 3: Sow the Tomato Seeds
Place one or two seeds in each cell. Cover them lightly with about 1/4 inch of soil. Gently press the soil down so the seeds make good contact. Proper seed-to-soil contact is the secret to successful tomato seed germination.
Step 4: Provide Warmth and Light
Tomato seeds need warmth to sprout, ideally between 70°F and 80°F. If your house is chilly, use a heat mat. Once they sprout, they need intense light. Place them under grow lights for 12 to 16 hours a day, keeping the lights just a few inches above the seedlings to prevent them from stretching.
Step 5: Watering Tomato Seedlings Correctly
Keep the soil consistently moist but never soggy. Overwatering can lead to “damping off,” a fatal fungal disease that causes seedlings to pinch at the base and fall over. Bottom watering (setting the tray in a shallow dish of water) is a great way to keep the surface dry and protect delicate stems.
Step 6: Thinning and Potting Up Seedlings
If both seeds in a cell sprout, snip the weaker one at the soil line with scissors. Once your seedlings outgrow their small cells and develop their second set of leaves, it is time for a tomato seedling transplant into larger 3-inch or 4-inch pots. This gives their roots room to expand and builds a stronger plant.
Caring for Tomato Seedlings Indoors
Proper tomato seedlings care is all about mimicking the great outdoors. Keep your grow lights close to the plants and raise them as the plants grow. If you rely on a sunny window, rotate the trays daily so the plants do not lean heavily toward the glass.
To build thick, sturdy stems, introduce a gentle breeze. Set up a small oscillating fan on a low setting to blow lightly over the seedlings for a few hours a day. This simulates wind and forces the plants to grow stronger cell walls. Finally, once your seedlings have their “true leaves” (the second set of leaves that look like actual tomato leaves), you can begin fertilizing tomato plants with a weak, half-strength liquid organic fertilizer every two weeks.
Hardening Off: Preparing Seedlings for the Outdoors
You cannot just take a tender indoor seedling and shove it into the blazing outdoor sun; it will sunburn and go into shock. You must “harden off” your plants. This is a crucial 7 to 10 day process of acclimating them to outdoor conditions.
- Days 1–3: Place the seedlings outside in a fully shaded, sheltered spot for just 1 to 2 hours. Bring them back inside for the night.
- Days 4–6: Gradually increase their time outside to 4 to 5 hours, introducing them to dappled sunlight or morning sun. Keep them out of harsh afternoon rays and strong winds.
- Days 7–10: Leave them outside all day in their final planting location, and if nighttime temperatures are safely above 50°F, leave them out overnight.
Taking the time to harden off your plants ensures a smooth and successful transition when you finally do your final outdoor tomato seedling transplant into the garden.
Transplanting Tomato Seedlings into the Garden or Containers
Once the danger of frost has passed and the soil has warmed up, it is time to plant!
Choosing the Right Planting Spot
Tomatoes are sun worshippers. Pick a spot that gets at least 6 to 8 hours of direct, unfiltered sunlight every day. Whether you are planting in the ground, building raised bed tomatoes, or doing container tomato gardening, ensure the location has excellent drainage. If planting in containers, use large pots (at least 5 gallons) filled with high-quality potting mix.
Tomato Plant Spacing and Planting Depth
Proper tomato plant spacing prevents disease by allowing good airflow. Space determinate bushes about 2 feet apart, and give sprawling indeterminate vines at least 3 feet of space. Here is a pro tip: plant your tomatoes deep! Bury the stem right up to the top set of leaves. Tomatoes will sprout roots all along the buried stem, creating a massive, drought-resistant root system.
Supporting Your Tomato Plants
Do not wait until the plants are huge to add support. Install your tomato plant support stakes or cages on the exact day you plant them to avoid damaging the roots later. When deciding between tomato cages vs stakes, remember that standard wire cages often fail to hold heavy indeterminate vines. Tall, heavy-duty stakes or a sturdy trellis system work much better for vining types, while short cages are fine for bushy determinate plants.
Ongoing Care: Watering, Feeding, and Pruning
Once planted, your focus shifts to maintenance. Establishing a good tomato watering schedule is critical. Tomatoes need about 1 to 2 inches of water per week. Water deeply at the base of the plant 1 or 2 times a week rather than giving them a light sprinkle every day. Consistent moisture prevents issues like blossom end rot and fruit cracking. Always avoid wetting the leaves, as damp foliage invites fungal diseases.
When it comes to fertilizing tomato plants, wait until the first fruits are about the size of a golf ball before applying a heavy feed. Use a balanced, tomato-specific fertilizer or embrace organic tomato gardening by using compost, worm castings, or organic liquid kelp. Avoid high-nitrogen fertilizers, which will give you beautiful, giant green leaves but very few tomatoes.
For pruning, it is mostly optional for beginners. However, if you are growing indeterminate varieties, pinching off the “suckers” (the little shoots that grow in the V-joint between the main stem and branches) can direct the plant’s energy into producing larger fruit. Finally, lay down a 2-inch layer of organic mulch, like straw or shredded leaves, around the base of your plants to retain moisture and suppress weeds.
Common Tomato Problems, Pests, and Diseases
Even with the best care, you might run into a few hiccups. Being able to spot common tomato problems early is half the battle. Yellowing lower leaves often indicate a nitrogen deficiency or just natural aging, but yellowing combined with spots can mean a fungal blight. Blossom end rot (a black, sunken spot on the bottom of the fruit) is usually caused by uneven watering, not a lack of calcium.
Keep an eye out for tomato pests and diseases. Aphids and whiteflies can be blasted off with a strong stream of water or treated with insecticidal soap. The massive green tomato hornworm can strip a plant of leaves in a day; simply pick them off by hand and drop them in soapy water. To stop soil diseases, practice crop rotation. This means you should never plant tomatoes (or peppers and eggplants) in the exact same spot two years in a row. Choosing disease-resistant varieties is also a massive help.
Harvesting and Enjoying Your Homegrown Tomatoes
The moment you have been waiting for! You will know your tomatoes are ready when they reach their full, vibrant color (red, yellow, or purple, depending on the variety) and yield slightly to a gentle squeeze. For the best flavor and to prevent splitting, harvest your tomatoes in the cool of the morning or early evening. Simply grasp the fruit and give it a gentle twist; it should pop right off the vine.
Enjoy your harvest in fresh summer salads, layered onto BLT sandwiches, or simmered down into a rich, homemade pasta sauce. There is a profound joy in eating food you grew yourself from a tiny seed.
Beginner FAQs about Growing Tomatoes from Seed
How long does it take to grow tomatoes from seed?
From the day you sow the seed to the day you pick your first ripe fruit, it generally takes 70 to 90 days, depending on the variety. The indoor seedling stage takes about 6 to 8 weeks before transplanting.
When should I start tomato seeds indoors in the US?
You should start them 6 to 8 weeks before your local last spring frost date. In southern zones, this might be January or February, while northern gardeners usually wait until March or April.
Can I grow tomatoes from seed in containers only?
Absolutely! Container tomato gardening is highly successful if you use large enough pots (5+ gallons), high-quality potting soil, and choose compact or determinate varieties.
Why are my tomato seedlings leggy?
Leggy, stretched-out seedlings happen when they do not get enough light. Move your grow lights closer to the plants (just 2 inches away) or supplement a sunny window with artificial lighting.
How often should I water tomato seedlings?
Check them daily. Water when the top surface of the soil feels dry to the touch, but ensure the soil underneath remains slightly moist. Bottom watering is a great way to maintain even moisture.
Start Your Tomato Journey Today!
Growing your own food is one of the most rewarding hobbies you can pick up. Now that you know the ins and outs of growing tomatoes from seed, it is time to grab your seed catalogs and start planning your schedule. Pick one or two beginner-friendly varieties this season and see how they perform in your garden. Have questions about your seedlings, or want to brag about your first harvest? Drop a comment below and share your tomato journey with our gardening community!